

Step By Step Lips Drawing
Capture the keys to a lifelike lip drawing.
Whether you want to get better at drawing faces, brush up your portrait drawing, or just hone your lip drawing technique, use this as your guide to sketching lips that bring the wow factor.
Before you start, find a reference photo to look at as you draw. "Of all the facial features, lips are where you see the most variety from person to person," says artist Jonathan Dockery. The number of facial expressions and shapes lips can take on is nearly infinite, so it's always helpful to keep a reference handy, whether it's your first time drawing lips or your fiftieth.
Five simple steps to realistic lips.
Follow along as artist Laura Bevis outlines a drawing tutorial with all the tips you need for a knockout lip drawing.
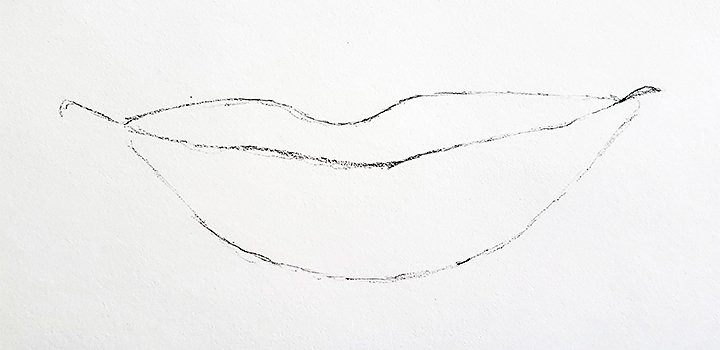
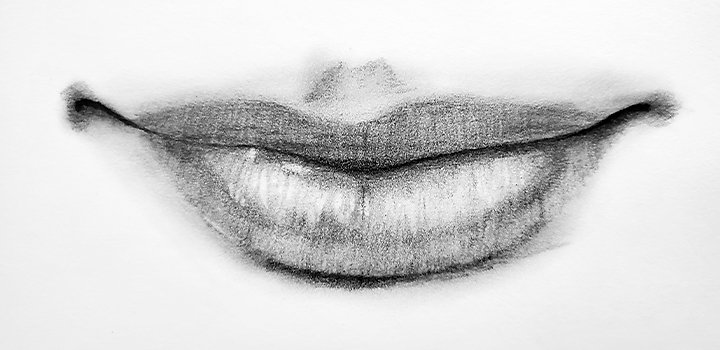
1. Outline the lip shape.
First, you'll notice that the center line between your upper lip and bottom lip extends past the corner of the mouth. "This curved line is where you get a lot of your expression. "Never draw it as a straight line," advises Bevis.
"The head is a cylindrical shape," Dockery points out. "Start with two dots to mark the corners of the mouth," he says. "Then find the line between those two points; one is usually higher or lower than the other." Pay attention to the curvature of the face and wrap your line around the curve. Now you have an anatomically accurate starting point.
Draw lightly, so you can go back over your final lines later with a firmer touch and use an eraser on any unnecessary sketch lines. If you're working digitally, you can simply trace over your underdrawings on a new layer.
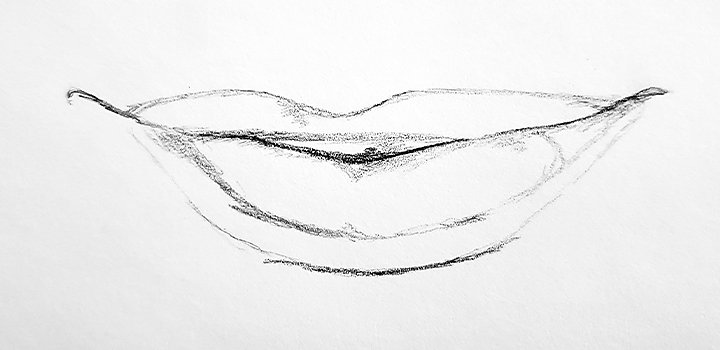
2. Sketch the defining characteristics.
Next, begin to shade the darkest areas of the lips: the corners, the center, and the upper middle of the lower lip. Outline a smaller shape inside the lip. "I map that part out as guidelines in order to preserve the white space I need for highlights," explains Bevis.
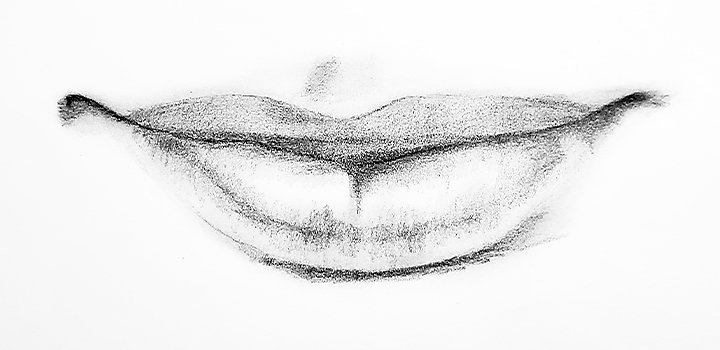
3. Fill in the lip.
Continue to refine your shading around the dark and light areas of the lips. To get the most realistic look, put the darkest darks next to the lightest highlights. You can also shade the area between the nose and the top lip, called the philtrum. "Most people aren't just drawing lips, they're drawing it as part of a human face," says Bevis. "It's important to get that interaction between the lips and the skin around the lips."
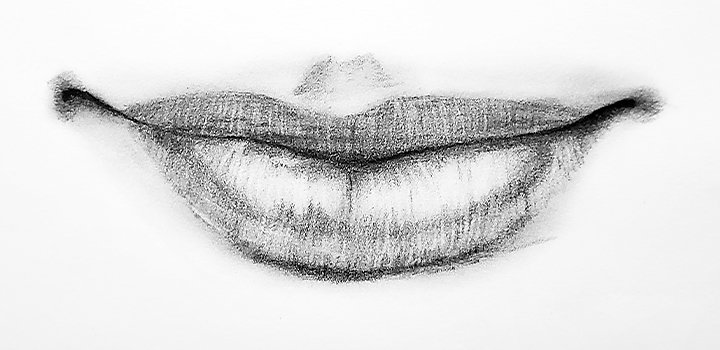
4. Add more shading and details.
"One of the most important things to focus on is contrast," says Bevis. "Without contrast, your lips will look flat and two-dimensional." To refine your shading technique, think about your light source as you position your highlights and shadows. The corners of the lips have the darkest values, no matter what, but the lip shape, expression, and position of the light all have a hand in determining how you shade. The top part of the bottom lip is usually the lightest.
As you shade, add vertical lines in the skin of the lips. But be sure that even these lines curve out from the center; straight lines won't help your lip drawing look natural.
5. Blend it out.
To polish off your drawing, blend it to soften the vertical lines and help the transition from lights to darks run together more smoothly. You can use a blending pencil or even your finger to do this. Or, in digital drawing programs like Adobe Fresco, you can select from a variety of mixer brushes to get the job done.
Step By Step Lips Drawing
Source: https://www.adobe.com/creativecloud/illustration/discover/how-to-draw-lips.html
Posted by: buchananlatepred.blogspot.com
0 Response to "Step By Step Lips Drawing"
Post a Comment