

How To Create A Tile Backsplash
Can you paint glass tiles?
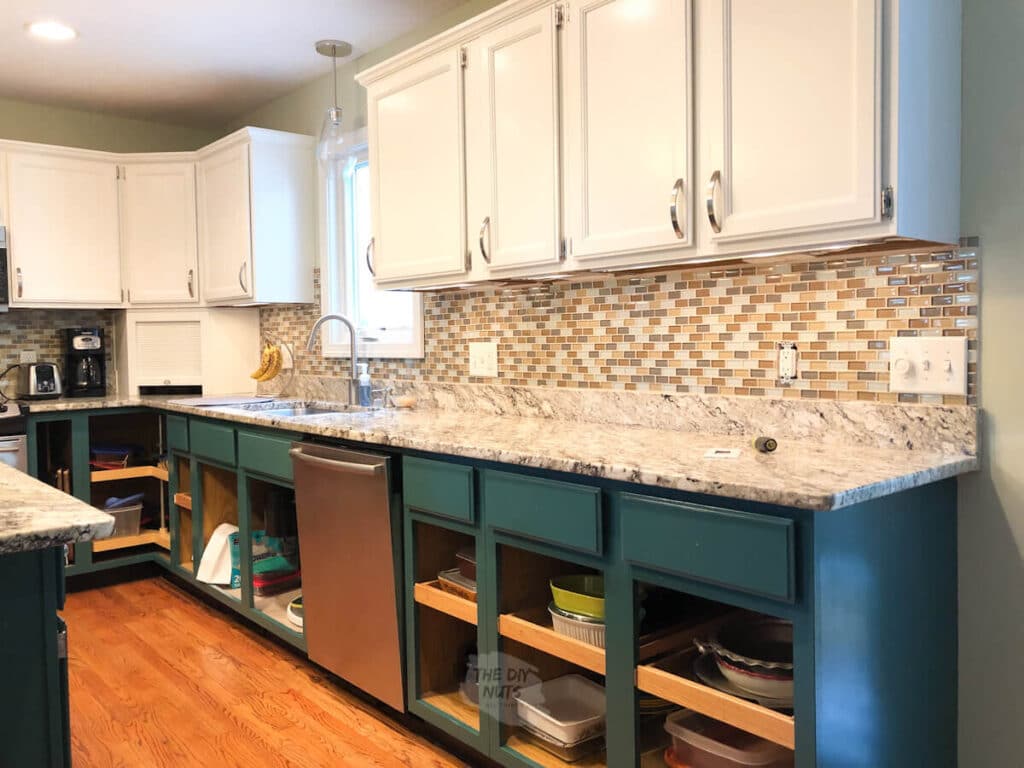
Why yes…you can! When we first moved into our house we knew that the kitchen needed some updating (you can see what our kitchen really looked like then). Over time, we had painted the oak cabinets white, added a glass backsplash and new counters. However, the glass mosaic backsplash of yesteryear (like 8 years ago) was totally dating our kitchen and never really matched.
To be fair, we tried to update our kitchen without replacing and painting everything first by adding this backsplash. I honestly cannot believe how awesome our glass tile makeover turned out. I wish I would have done it years ago.
Now 8 years later we have jumped on the two-toned kitchen cabinet trend and wanted a completely fresh look with the backsplash. As you can see we were working on painting the lower cabinets and doors (this link is our detailed door painting process) at the same time.
*Disclosure: I only recommend products I would use myself and all opinions expressed here are our own. This post may contain affiliate links that at no additional cost to you, I may earn a small commission. Read full privacy policy here.
First, is painting tile a good idea?
While we have not painted tile floors or tubs, we think painting your tile backsplash is a great way to modernize your kitchen. Mainly, your backsplash really doesn't get touched and beat up like other tiles in your home. You also can have a modern look without going through the hassle of completely tearing out tile.
And for us, we knew that if this didn't work we needed to update the tile. So it was totally a risk we were willing to take. Honestly, we were shocked at how well our tile painting project turned out.
"What do you have to lose? Just paint it and you might be surprised." -A DIY Motto from The DIY Nuts
Why did I choose to paint the tile white?
I felt that it would give the tile a more cohesive subway tile feel. I wish our counters had a little more bright white in them. However, I didn't want to go with a warmer white and have that conflict with the upper cabinets, white moldings, and doors we already have. The good news is that I can easily change the color if I want. We have some amazing real-life examples of white kitchens if you need help comparing white cabinet paints for your kitchen.
How long did it take to paint the tile backsplash?
This was a very easy and quick project. The only thing that took the most time was the dry time. We have around 20 square feet of tile and this tile painting process was easily accomplished in two days.
The most time-consuming part is the prep. Each layer of primer or paint was done in 30-40 minutes.
What supplies should you use to paint tile?
We researched a lot of different ways to paint tile. And first, everyone said that the prep is the most important part. Any time you are painting you want a clean surface so don't skimp on this. We used dawn dish soap, extra-fine sandpaper and Krud Kutter. I felt that our tile backsplash was completely clean and ready.
Some DIY painters recommended using an electric sander and something called TSP. My tiles were not that greasy so I thought my prep process was the simplest and easiest.
As far as the paint, once we found a primer (more on this later) that we thought would work we simply used a 2.5" angled brush and small foam roller to apply our favorite latex enamel paint from Sherwin Williams.
Simplified printable instructions are at the bottom of this post.
What primer should I use to paint glass tile?
So this part actually took me the most time due to places not having the primer I wanted. My first choice is to always just go to Sherwin Williams and have them tell me what I need. Paint stores are always pretty knowledgeable (definitely more than most at the big box stores).
I will say at any place it does always matter who you get, so I am sure that this is only my personal experience.
Due to the paint shortage through the supply chain or Sherwin Williams, they did not have the bonding primer I wanted to use. They recommended Stix and I went to order it on Amazon. However, even then that shipment was delayed…
And I really wanted to start this tile painting project!

Off to Home Depot I went. I found this primer that was meant for glossy surfaces in kitchens and bathrooms. I figured for the price, I would just buy it and try it in a small area. In the video in this post, you can see how I test the area by rubbing the tile to make sure the primer truly was sticking before doing the whole backsplash.
What paint do you use to paint glass tile?
After painting our kitchen island with Sherwin Williams Urethane Trim Enamel, I knew this was the paint I wanted to use. You will not be disappointed in this self-leveling paint. I bought a gallon of white because I figured I will repaint our upper cabinets whenever I get a spare moment.

Other things to consider are the finish you want your tiles to be. Semi-gloss was the perfect choice for us because it gives the tile a little glossy look. We also like semi-gloss for the trim and cabinets as well. I would probably only use semi-gloss or gloss for cleaning reasons. We are hoping that these tiles will be able to be easily cleaned or wiped in the future.
Pin For Later!
Other things we considered before painting our tile white
We thought about trying one of the epoxy kits meant for tile. However, they are smelly, and who really touches a kitchen backsplash compared to other areas in your home? We figured since this isn't a bathroom floor or something we could try a simpler method.
Also, I didn't want to add one more different white to our kitchen. By buying a gallon of the Highly Reflective White (not tinted) from Sherwin Williams I knew I could use that paint to make everything match if I want to in the future.
Do you paint over grout lines?
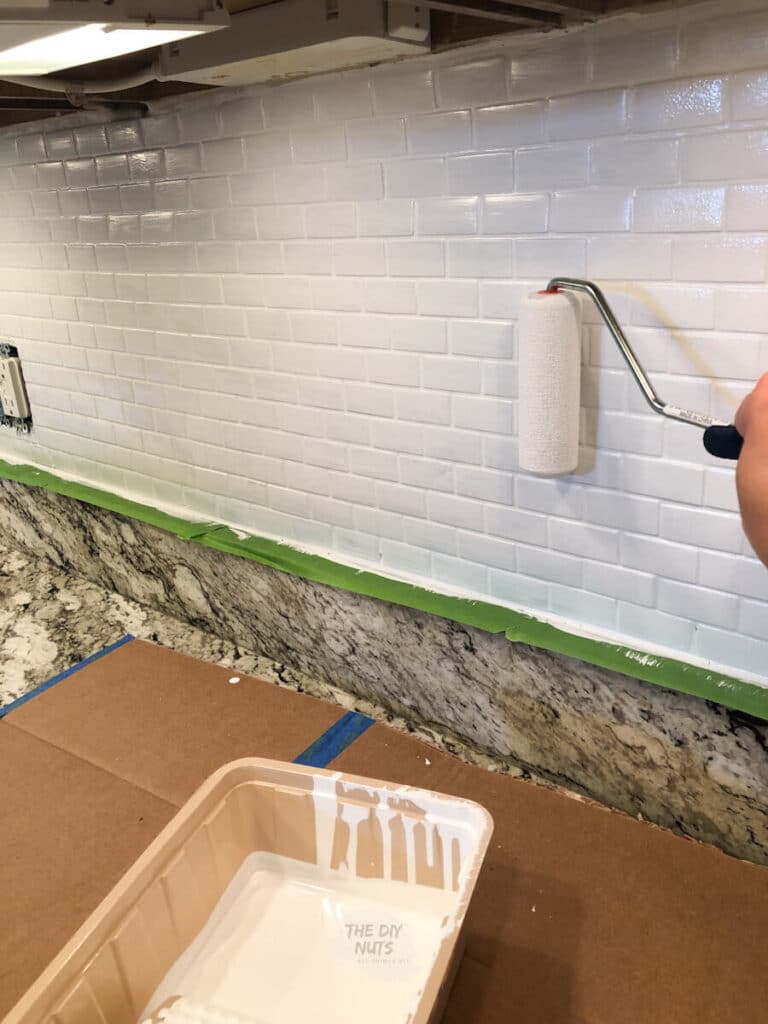
I used a brush first to cover all the grout lines and then a small roller to create a smooth look. I love the clean look of just an all white painted tile backsplash.
Our tile backsplash painting process
*Note our paint was not tinted and it comes as a color called Highly Reflective White. If you are trying to decide between colors you may want to check out Samplize where you can get larger peel and stick samples of your favorite colors.
You can read how we used Samplize to help pick our bottom cabinet color here.
Steps for painting tile backsplash
See the video in this post as well.
1. Clean tile with dawn dish soap and sponge. You want to make sure that you are cutting the grease and grim. Really make sure you have cleaned while around your stove as that is where it tends to be a little dirty and greasier (hello bacon at our house).

2. Wipe dry.
3. Use extra-fine sandpaper to scuff up the tile. I did not do a ton of this, just enough.

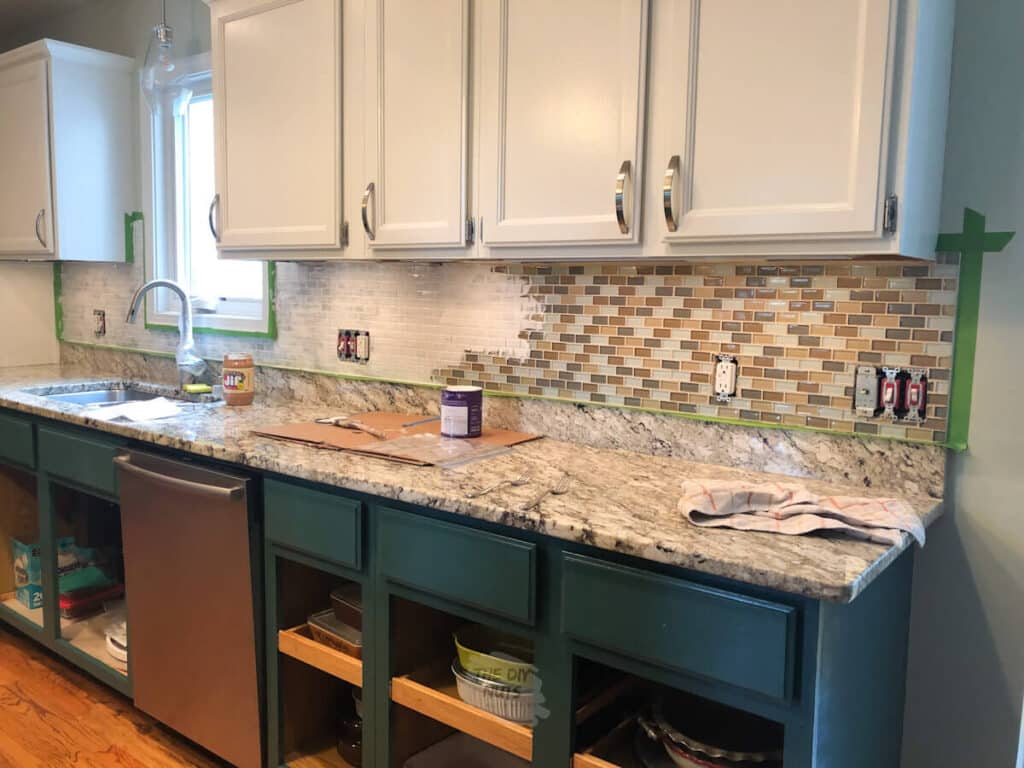
4. Wipe areas you don't want to be painted like the counters and window frames. Add painter's tape to the areas. Press your fingernail in the seam in between the counters and the tile. You may need to caulk this area after you paint.
DIY PAINT TIP!!! Use Press N' Seal Wrap to help protect things you don't want painted. We did this for our oak railing when using two different colors.

It was great for the faucet in this case. If you wrap it loose enough, you will still be able to use the faucet as well!
5. Wipe down tiles with a deglosser.

6. Use a brush with primer to cover all the grout. Work in small areas. If your tile is larger you may use a roller after the brush in the grout lines. Since our glass tile is so small, I only used a brush for the primer.

7. Make sure that you are lightly brushing away drips. This is probably the trickiest part of the painting. If you do end up with a few bumps, you can always sand them before the next coat.
8. Read the instructions on the primer you chose. This primer was dry to the touch within 30 minutes to 1 hour. It really was, so this helped with the overall length of time this project took.
Once the primer is dry, you can repeat the brush painting with your paint. We used Sherwin Williams Urethane Enamel in this color.

Don't let the splotchy priming job worry you. The most important part about priming anything is that you have completely covered the surface you are painting. You can see how the white color is much more solid once you start using paint.
9. After the first coat of paint with the brush, the next two were done mainly use the small foam roller . This allowed for more even coverage. Just make sure that your grout is completely painted to your liking as working.
10. Allow proper dry time between each coat of paint. You may need 2-3 coats of paint depending on how dark your tiles were to begin with. We used 3 coats of paint.
11. Remove painter's tape and caulk any areas for a clean look.

Do you need more DIY painting project inspiration?
Check how we use accent walls to transform our small spaces or even how our bathroom vanity looks completely brand new with just a little paint.
Follow us on Pinterest or Facebook for more DIY inspiration!
Pin this image for a great reminder of this project!

One more "before" picture of our glass tile backsplash in case you don't remember what it looked like…
Yes, I know the angle is a little different and this is what our cabinets looked liked before I also started painting the lower cabinets. But you can totally get the idea of the amazing transformation using ONLY paint!

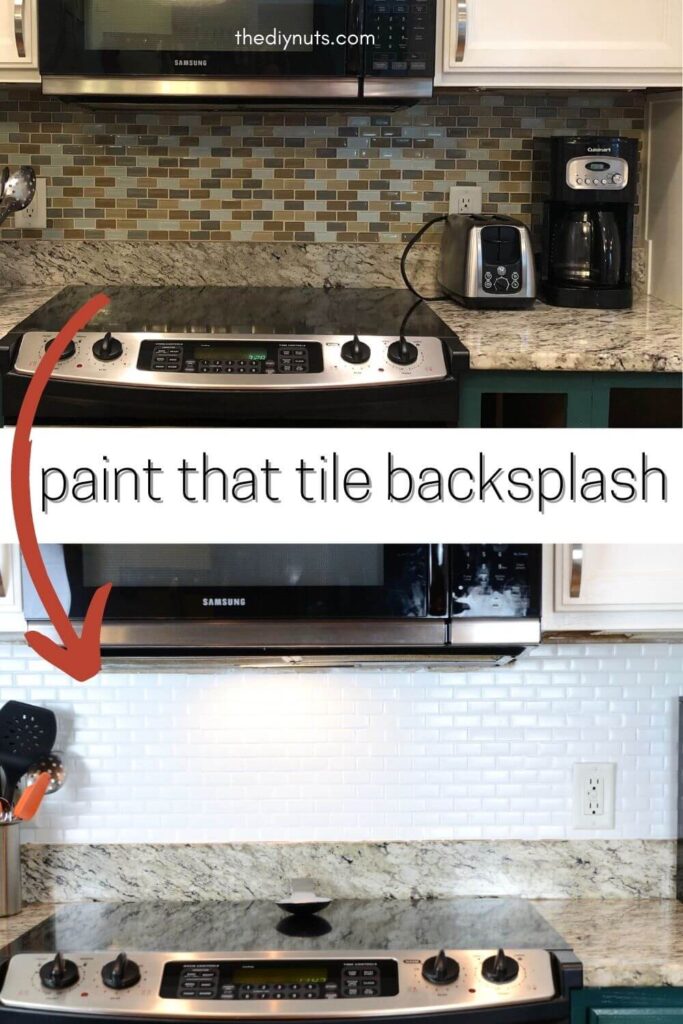
And then paint magic!

Follow us on Pinterest or Facebook for more DIY inspiration!
Prep Time 30 minutes
Active Time 4 hours
Additional Time 1 day
Total Time 1 day 4 hours 30 minutes
Difficulty Medium
Estimated Cost under $50
Materials
- Deglosser
- 220 Sandpaper
- Dawn Dish Soap
- Primer
- Sherwin Williams Emerald Urethane Trim Enamel Paint
- Butcher Paper, Cardboard or Drop Cloth
Instructions
- Clean tile with dawn dish soap.
- Wipe dry.
- Use extra-fine sandpaper to scuff up the tile.
- Wipe away dust.
- Tape out areas you don't want painted and cover counters with cardboard, drop cloth, or butcher paper.
- Optional: Use Press and Seal to protect the faucet handle.
- Wipe down tiles with deglosser.
- Use a paintbrush to paint grout lines and a small foam roller with primer. Make sure to wipe away any drips that are occurring when painting before it dries.
- Let dry (read instructions on dry time).
- Repeat with Urethane Trim Enamel paint in the color of your choice.
- Paint at least 2 coats with proper dry time in between.
- Remove painter's tape and clean up any areas.
Notes
Read through the whole blog post and watch the video for more specific and detailed instructions.
We absolutely can't get over how much our painted tile backsplash has modernized our kitchen.
How To Create A Tile Backsplash
Source: https://thediynuts.com/how-to-paint-a-tile-backsplash/
Posted by: buchananlatepred.blogspot.com
0 Response to "How To Create A Tile Backsplash"
Post a Comment